This is a how-to for software developers that want to build the Waba Virtual
Machine from source code.
-
To start out, you need a C compiler that can compile Windows CE programs.
This means you need all of the following:
- Visual C++
- Windows CE Toolkit for Visual C++.
- The Windows CE SDK's
Visual C++ and the Windows CE Toolkit are commercial software. You can
download the Windows CE SDKs for free from Microsoft's site.
With the name "SDK", you might think you can just use it to develop Windows
CE programs but you can't. You need the Windows CE Toolkit to develop
Windows CE programs. The names are confusing.
After getting Visual C++ and the CE Toolkit, you can download the
Windows CE "SDK"s from Microsoft's web site. You'll probably want
the "Palm-size PC SDK" and the "Handheld PC SDK" at a minimum.
These downloads are an extraordinary 50 megabytes and 25 megabytes
respectively so make sure you have a lot of free disk space before
you start installing everything.
You can download the SDK's by going to Microsoft's Windows CE page:
http://www.microsoft.com/windowsce
and then clicking on the 'Developer Web Sites" link. I didn't put a direct
link to the SDK page here because it has a history of moving around.
You also need to be careful that your Windows CE Toolkit, Visual C++
version and Windows CE SDK versions match up. The SDK requires a specific
version of the toolkit and the toolkit requires a specific version of Visual
C++.
Once you've got all of that installed, it's fairly easy to build the
WabaVM for Windows CE.
-
The first step is to create a project in Visual C++ for the WabaVM.
You can use the "New..." button in the File menu and then
choose Project in the "New" Dialog to create a new project.
The project window looks like this:
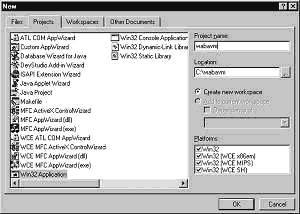
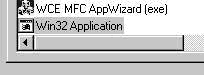
You should choose "Win32 Application" for the type of project:
This is kind of confusing because we're building a Windows CE
application but that's what we want. You should see things
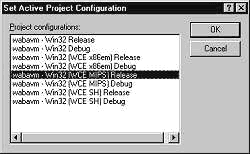
like 'WCE MIPS' and 'WCE SH' in the Platforms list in the lower
right of the dialog, as in the first image above.
If you don't see them then the Windows CE Toolkit isn't properly installed.
Different Windows CE devices have different processors and you need
to build a WabaVM for each type of processor you want to support.
The SH3 and MIPS processors are the most common type of processor.
With Waba you just build one Waba program that can run on any CE processor,
but with Visual C++, you need to build one program for each processor
you want to support.
-
Now that you have your project set up, you should add the waba.c
file to the project. You should only add the waba.c file and none of
the other .c files that are part of the WabaVM source to the project:
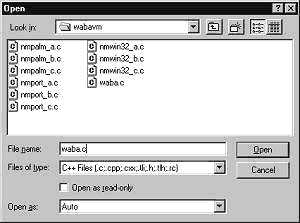
After adding the waba.c file to the project, the window should look
like something like this:
-
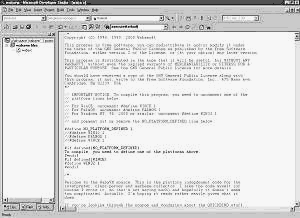
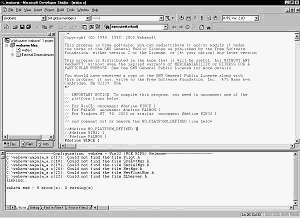
Now you should edit the waba.c source and comment out the #define for
NO_PLATFORM_DEFINED and uncomment the #define for WINCE.
After editing, the code should look like this:

-
Next, you need to choose the type of CE processor you want to
build an executable for. Choose the Build menu and then
"Set Active Configuration" to set which CE processor you are building
an executable for. In this dialog, WCE MIPS has been chosen:
-
Now you need to add the libraries that the WabaVM needs to link. The
WabaVM requires the winsock.lib library since it has networking code
in it. To add the library, you should choose the Project menu
and then "Settings.." to get the Project Settings Dialog:
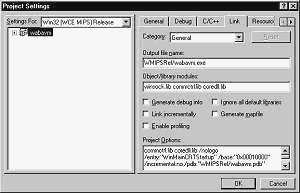
Then click on the Link tab and add winsock.lib to the
"Object/library modules" edit field:

-
That's it, you're ready to build the WabaVM. You can either click
on the build button or choose "Rebuild All" in the Build menu.
After building, you'll notice that in the window on the bottom,
there are a bunch of messages:
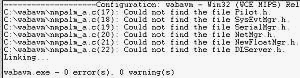
That's the Microsoft compiler complaining that there are some
PalmOS include files that are referenced in the code that it
doesn't know about. It really shouldn't be complaining because
those include files are #ifdef'ed out and aren't actually included.
The messages are just informative messages and don't affect the build.
To build for each different processor type, you'll want to
repeat steps 5 through 7 for each different type of processor.
The result of the build is a waba.exe. It and a waba.wrp, containing
the waba foundation classes, together make up the WabaVM for Windows
CE.